今回はボタンの使い方についてまとめていきます。
ボタン
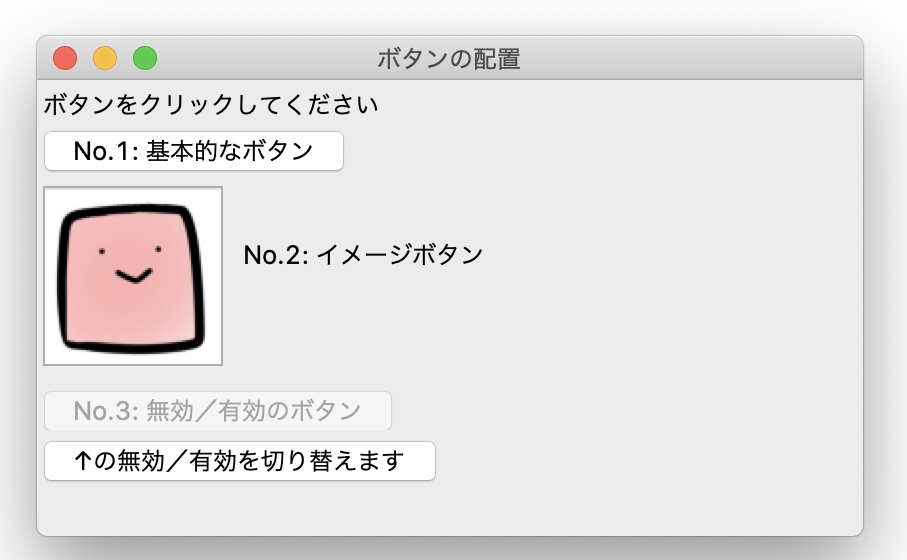
以下のように表示する方法を記載していきます。
全体のコードは以下のようになります。
import tkinter as tk

root = tk.Tk()
root.title("ボタンの配置")

label = tk.Label(root, text='ボタンをクリックしてください')
label.place(x=0, y=0)

def btn_click():
    """
    ボタンクリック時のイベント
    """
    label['text'] = "ボタンをクリックしました"

# No.1: 基本的なボタン
button01 = tk.Button(root, text='No.1: 基本的なボタン', command=btn_click)
button01.place(x=0, y=20)

# No.2: イメージボタン
tk.Label(root, text='No.2: イメージボタン').place(x=100, y=75)
button02 = tk.Button(root, command=btn_click)
button02.place(x=0, y=50)

image = tk.PhotoImage(file='square.png')
button02['image'] = image

# No.3: 無効/有効のボタン
button03 = tk.Button(root, text='No.3: 無効/有効のボタン')
button03.place(x=0, y=150)
button03['state'] = 'disabled'

def switch_state():
    """
    No.3ボタンの無効/有効を切り替える
    """
    if button03['state'] == 'disabled':
        button03['state'] = 'normal'
    else:
        button03['state'] = 'disabled'

tk.Button(root, text='↑の無効/有効を切り替えます', command=switch_state).place(x=0, y=175)

root.mainloop()
基本的なボタン
まず、ボタンをクリックしたことを表示するラベルと、ボタンクリック時にラベルの文字列を変更するイベントを作っておきます。
label = tk.Label(root, text='ボタンをクリックしてください')
label.place(x=0, y=0)

def btn_click():
    """
    ボタンクリック時のイベント
    """
    label['text'] = "ボタンをクリックしました"
tkinterのButtonクラスを呼び出すことでボタンを設定します。第一引数にはウィンドウのオブジェクト、第二引数以降には各属性値を設定します。text属性はボタンに表示する文字列、command属性にはボタンクリック時のイベントを設定できます。
button01 = tk.Button(root, text='No.1: 基本的なボタン', command=btn_click)場所を指定するにはplaceメソッドでX座標、Y座標を設定します。
button01.place(x=0, y=20)イメージボタン
画像のボタンを表示するにはPhotoimageメソッドで画像のオブジェクトを作成し、ラベルのimage属性に設定します。
image = tk.PhotoImage(file='square.png')
button02['image'] = image
※button.pyファイルと同ディレクトリにsquare.pngという画像ファイルを配置しています
有効/無効のボタン
ボタンを無効化するには、state属性に’disabled’を設定します。
button03['state'] = 'disabled'無効にしたボタンを有効化するには、state属性に’normal’を設定します。デフォルトではこの状態が設定されています。
button03['state'] = 'normal'※今回の例では下のボタンをクリック時にボタンの有効/無効を切り替えるようにしています
その他の属性値はラベルと共通するものが多いので、ラベルの記事やPythonのドキュメントを参考に設定してみてください。